Setting up VPNs on TrueNAS SCALE
Gluetun VPN Add-on Setup Guide
Basic setup of the TrueCharts Gluetun VPN addon
Prerequisites
- Anything migrated to the new common chart that features
Gluetun - Ideally a VPN provider supported by
Gluetun, check the Gluetun Wiki for more info. There are custom providers but that is beyond the scope of this guide.
Gluetun VPN Addon Setup
- Install app as per usual and scroll down the to the
Addonssection - Click on
VPNand selectGluetun
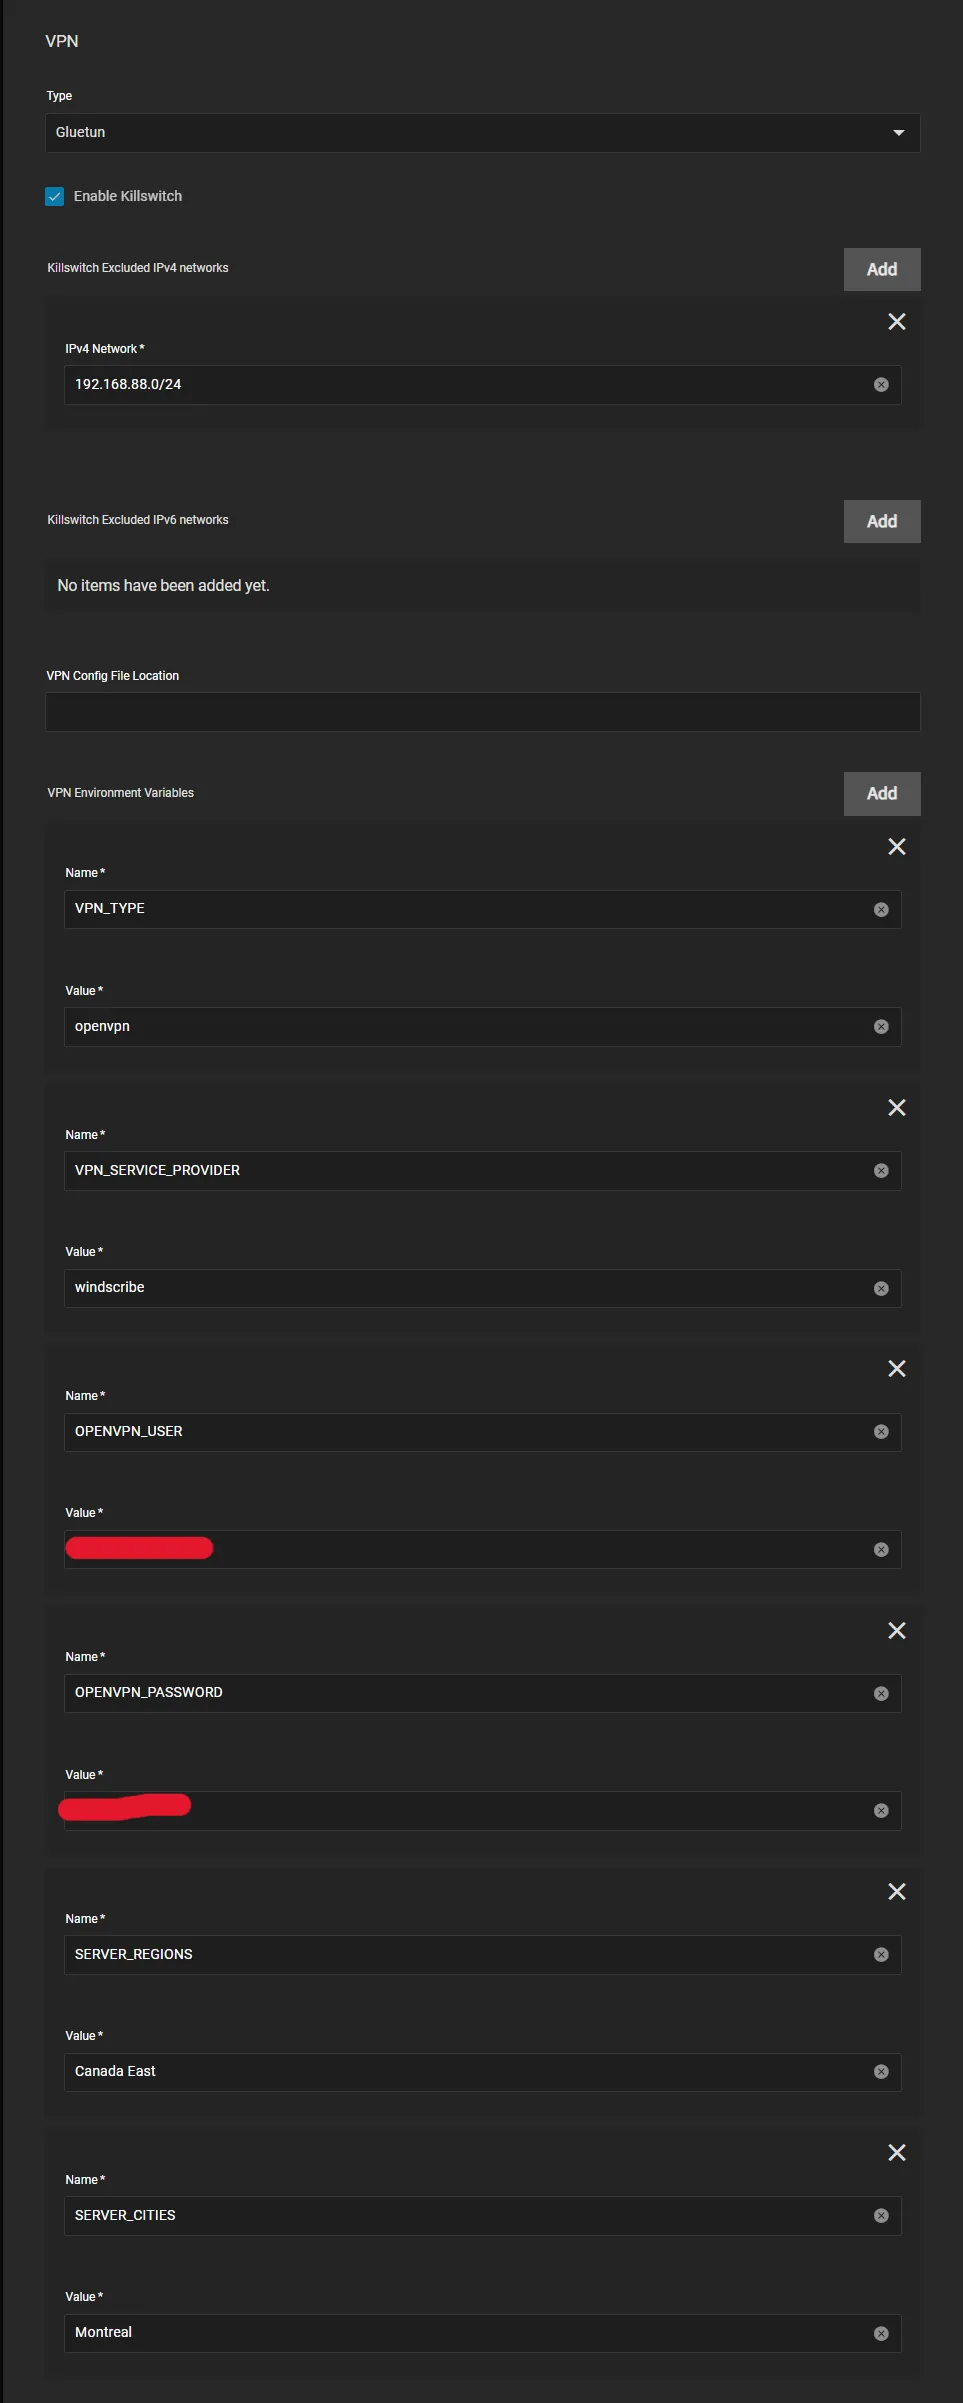
Gluetun works with Environment Variables so we need to configure them below. Enter your VPN Provider specific ones (see below)
OpenVPN Example
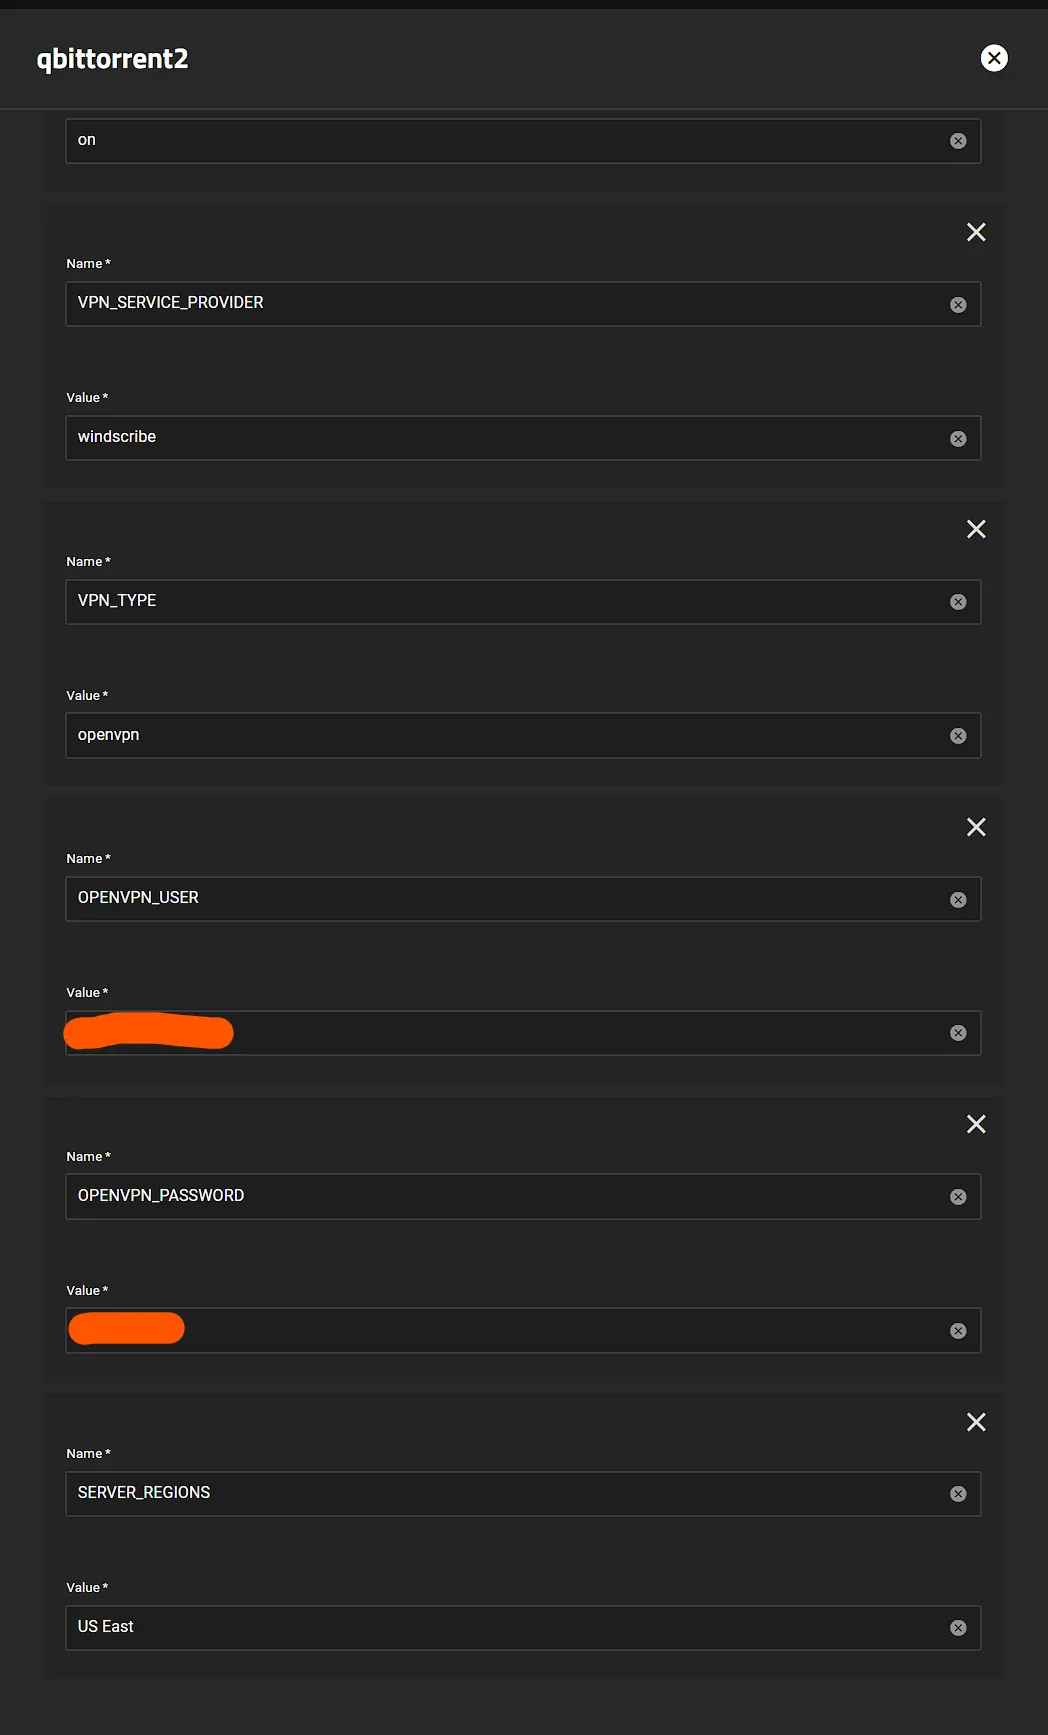
- All providers will generally need
VPN_SERVICE_PROVIDERandVPN_TYPE, for me it’sWindscribeandopenvpnbut I could easily chooseWireguard - Scroll to the Gluetun Wiki and find your specific provider and enter their info, eg Windscribe Wiki Page
Wireguard Example
I will demonstrate using Mullvad as the provider.
-
I pull my private key, endpoint port and Wireguard Addresses from a
Mullvadwireguard config file.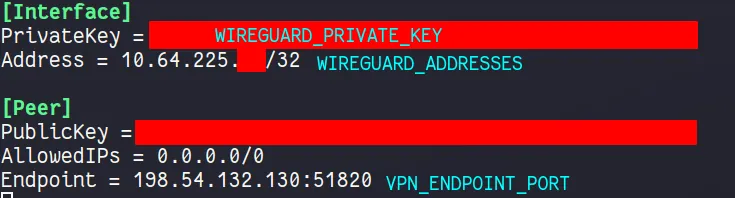
-
You can generate a new config file from the
Mullvadwebsite, here is the Mullvad Config Generator
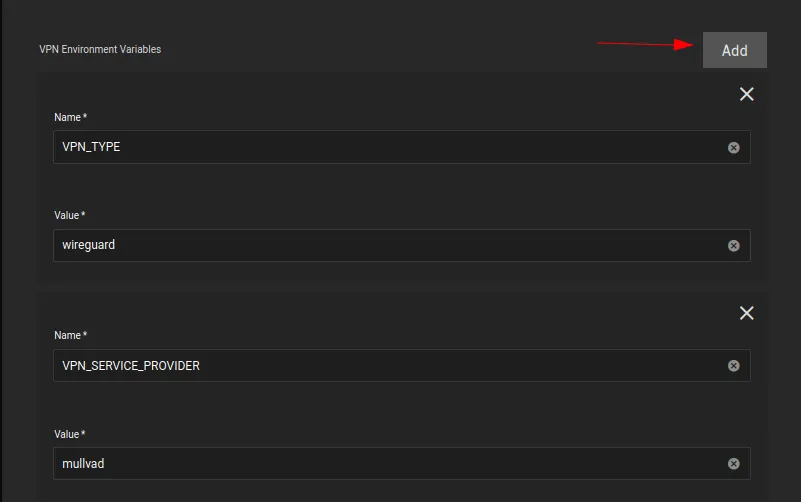
Now we can enter the Env Vars
-
Install app as per usual and scroll down the to the
Addonssection, clickAddfor each new environment variable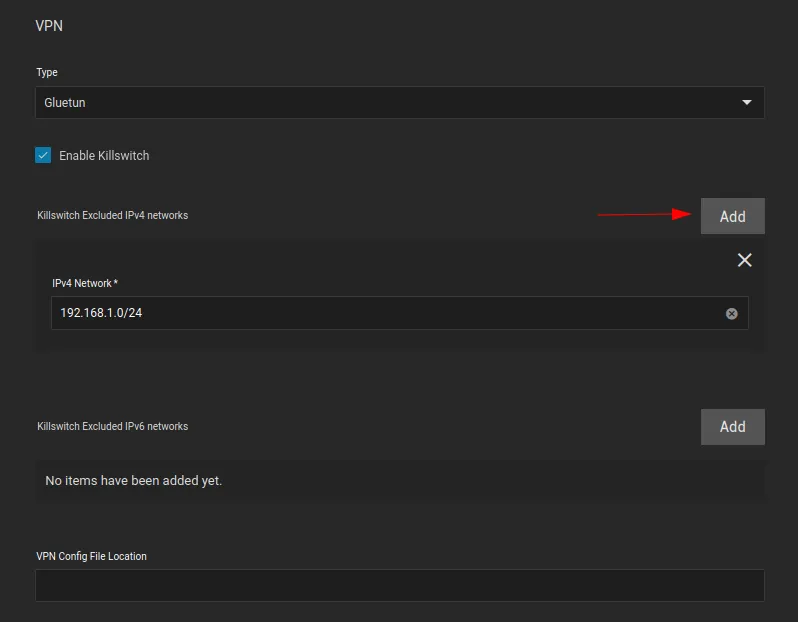
-
Enable the killswitch by ticking
Enable Killswitchbox -
Click
Addfor every subnet you would like to exclude from the VPN tunnel. I have added my local subnet.
-
VPN Config File Location is not necessary, we will be using environment variables instead, so leave it blank
-
VPN_TYPEiswireguard -
VPN_SERVICE_PROVIDERismullvadin my case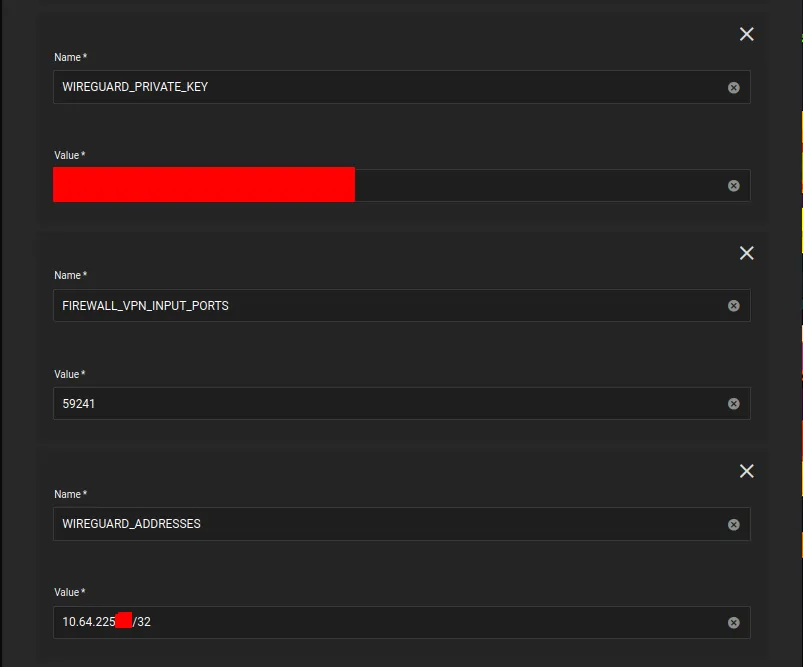
-
WIREGUARD_PRIVATE_KEYis the private key from theMullvadconfig file above -
FIREWALL_VPN_INPUT_PORTSis the port forward port. -
WIREGUARD_ADDRESSESis theMullvadendpoint IP address, found in theMullvadconfig file above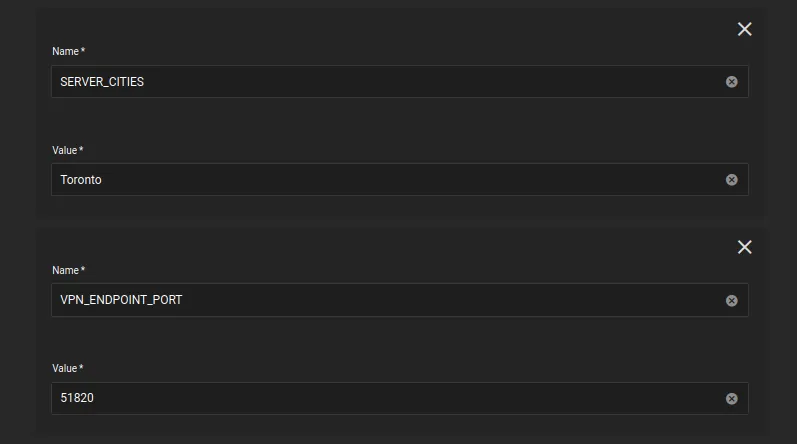
-
SERVER_CITIESis theMullvadserver city, it should likely be in from the same city your config file is from, and should share the same city as your forwarded port. In my case, I am using theTorontoserver city, and my forwarded port is fromToronto. -
VPN_ENDPOINT_PORTis theMullvadendpoint port, found in theMullvadconfig file above -
Basically same as above but needs the
VPN_TYPEswitched towireguard,WIREGUARD_PRIVATE_KEYandWIREGUARD_ADDRESSES
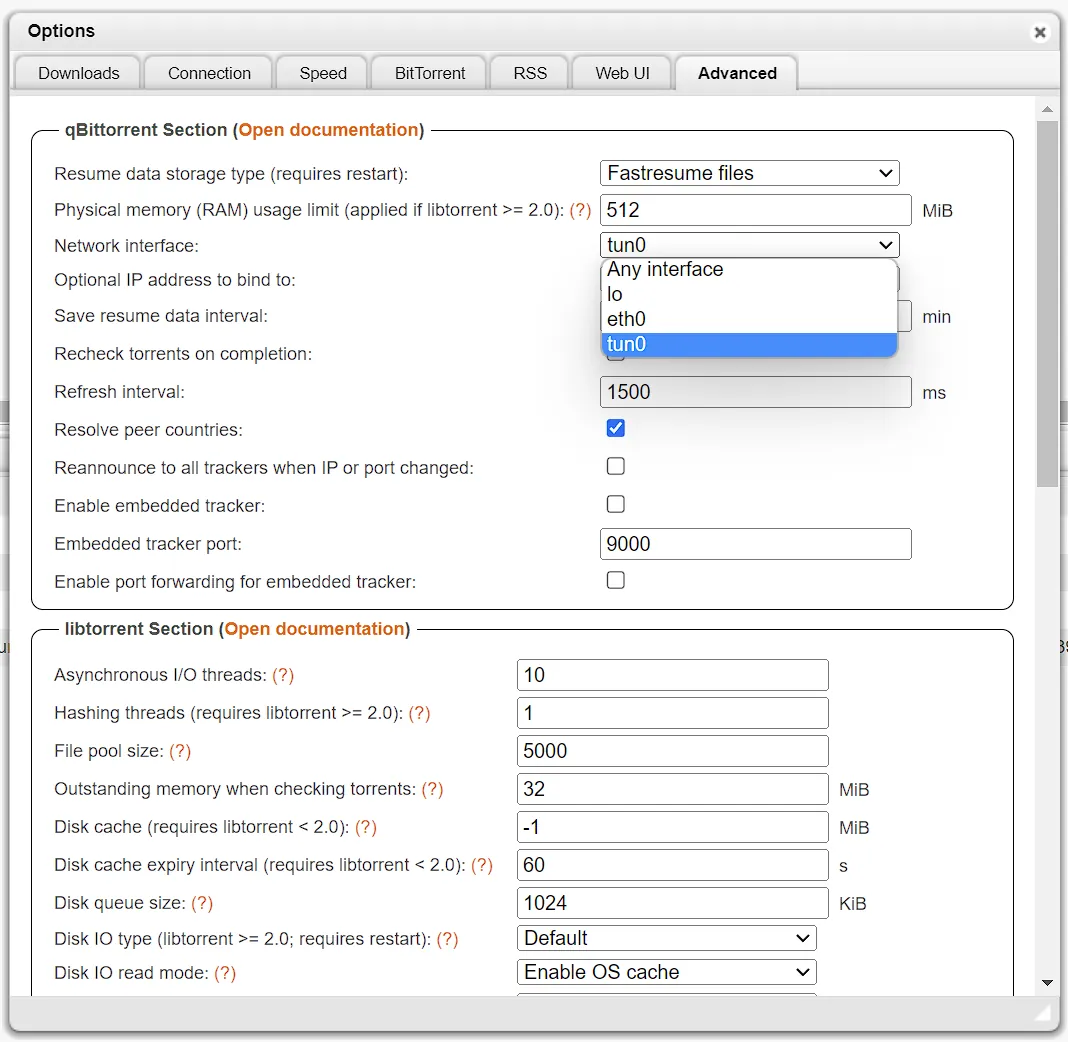
Verify it works
Easiest way to verify after it deploys (the app will fail if your credentials don’t work) for me is using qbittorrent since the network page shows the interfaces
can be shown quickly (or check the logs), the interface will be tun0.
Additional Gluetun Options
Proxy Example
Gluetun offers HTTP (and Shadowsocks) proxy support. This is useful in scenarios when a private tracker requires the same IP address for both indexing and downloading torrents. It is also generally useful if you want to route some HTTP traffic through your VPN from another container.
Step 1: Set the HTTP Proxy VPN Environment Variables
HTTPPROXY:onHTTPPROXY_LOG:on(optional, but useful to verify initial setup)
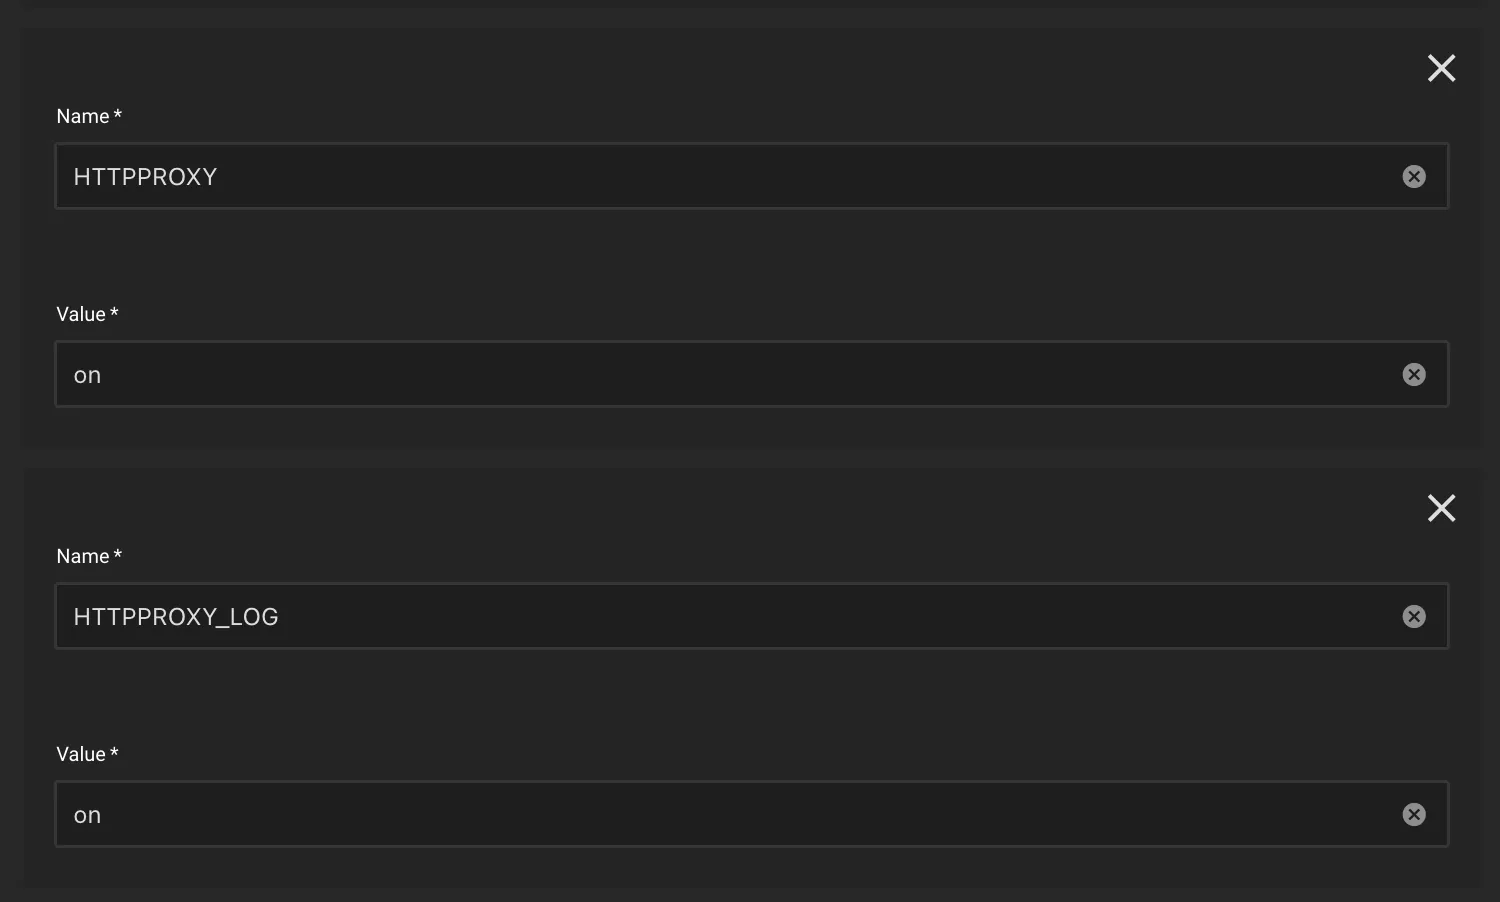
Gluetun’s default HTTP proxy port is 8888. If you wish to change the port, then change it by adding the HTTPPROXY_LISTENING_ADDRESS environment variable.
See Gluetun’s website for more proxy configuration options (like setting a username/password):
Step 2: Add a new service for the proxy
On the same app where you configured the Gluetun VPN addon proxy environment variables, add the following:
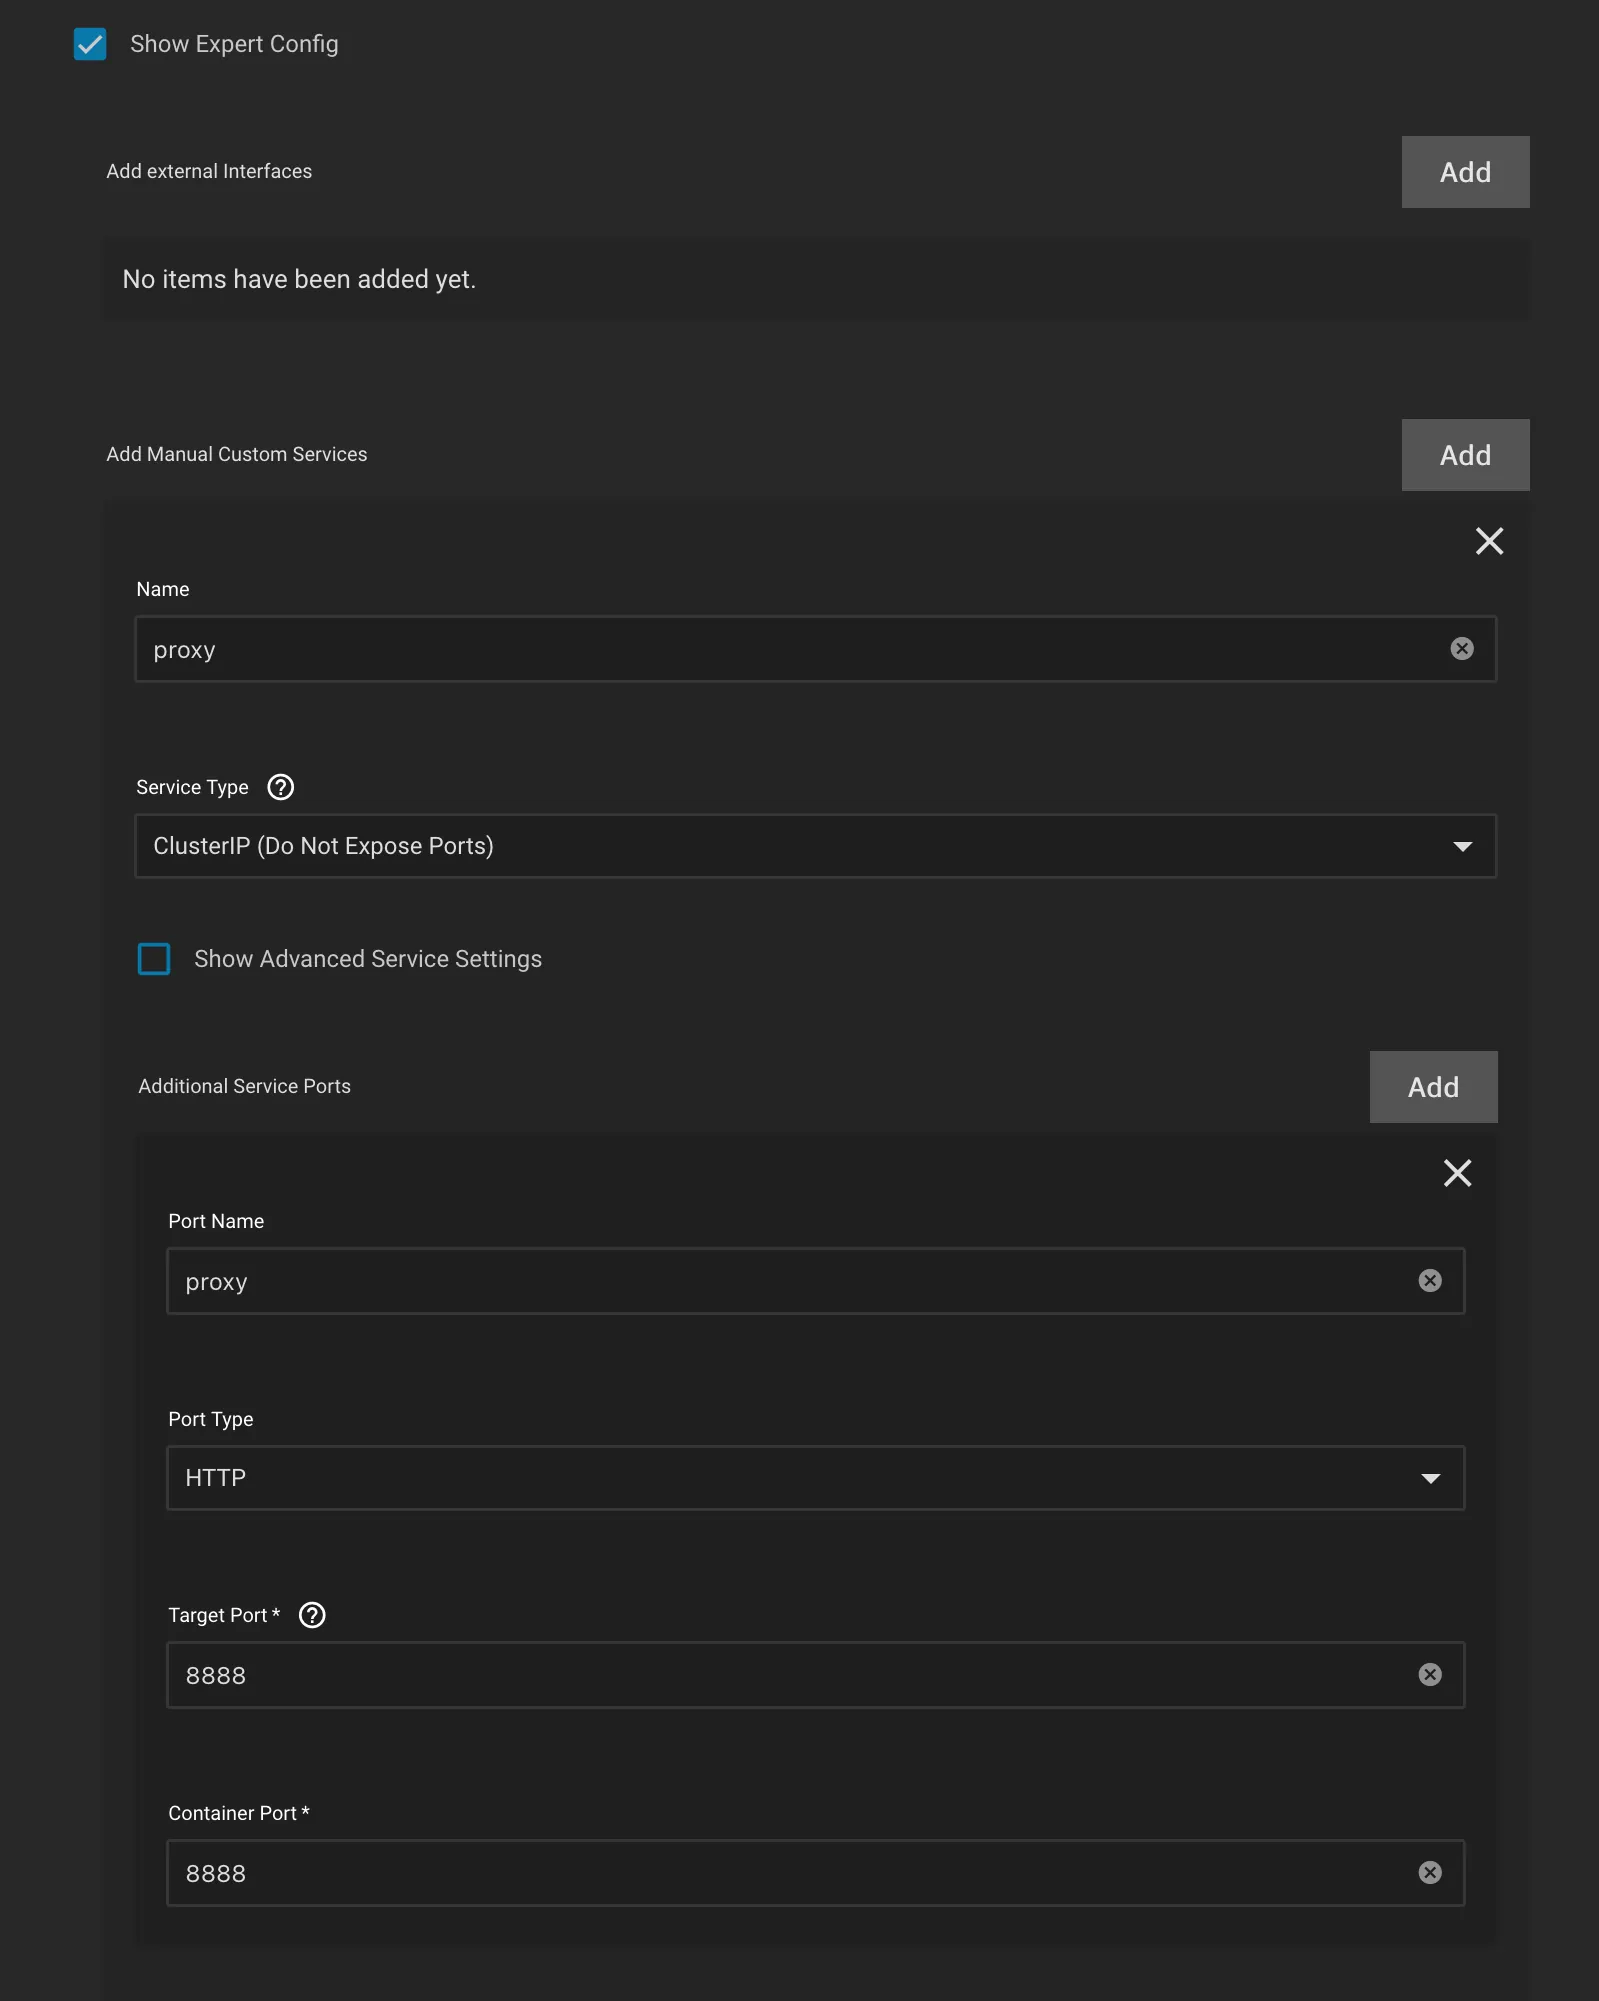
- Under
Networking and Servicessection, checkShow Expert Config - Click Add for
Manual Custom Services- Name:
proxy - Service Type:
ClusterIP(if you plan to use the proxy external to SCALE Apps, then setLoadBalancer) - Port Name:
proxy - Port Type:
HTTP - Target and Container Port:
8888(Gluetun default for HTTP proxy)
- Name:
- Click Save
Step 3: Determine the proxy internal DNS name
The service name will end in -proxy. For an app named qbittorrent it will be:
qbittorrent-proxy.ix-qbittorrent.svc.cluster.local.
If your app is named something different, you can look it up using
k3s kubectl get svc -Aor- the DNS command in heavyscript (
heavyscript dns --allorheavyscript --dns -v)
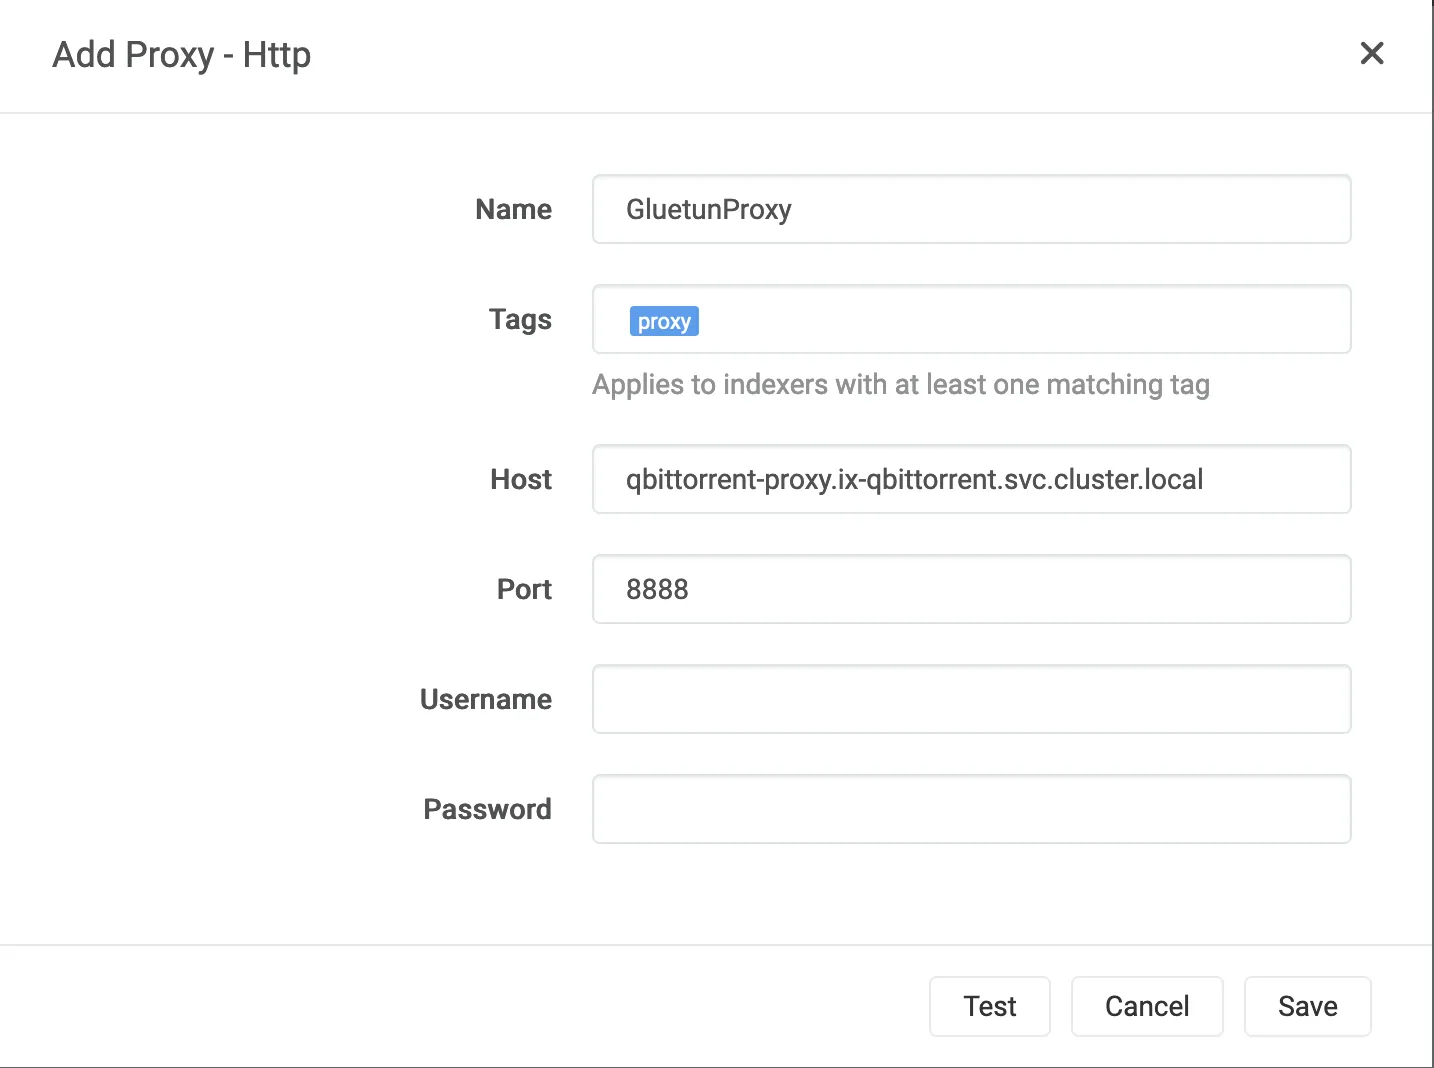
Step 4: Configure the proxy in your indexer app (Prowlarr)
- In Prowlarr, under
Settings -> Indexers -> Add [Indexer Proxies], selectHttp- Name:
GluetunProxy(or whatever name you prefer) - Tags:
proxy(set this if you only want the proxy to be used on certain trackers/indexers, otherwise leave blank) - Host:
qbittorrent-proxy.ix-qbittorrent.svc.cluster.local - Port:
8888(or whatever port you configured) - Username & Password: leave blank (unless you added those env variables).
- Click Test to confirm connection, then Save.
- Name:
If you added a proxy tag, make sure to also add that to the desired Indexers, under Indexers -> Edit Indexer -> Tags.
Your indexer traffic will now be routed through the Gluetun HTTP proxy. Check the qbittorrent-vpn container logs to confirm.
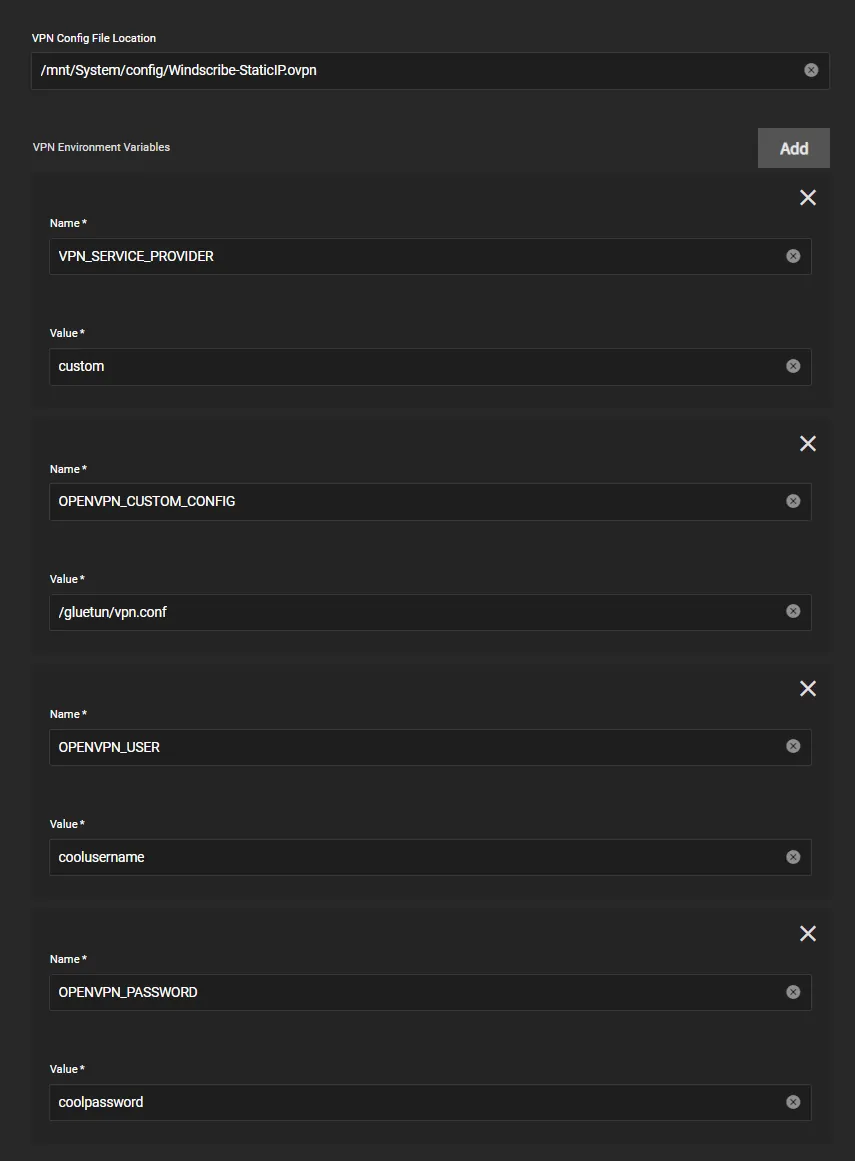
Custom Provider Example
If your provider isn’t supported by Gluetun then you can use a custom provider and configure as below, for example here’s a provider with OpenVPN
- Note: use
/gluetun/vpn.confforOPENVPN_CUSTOM_CONFIGand not the path specified inside theVPN config file locationabove
Troubleshooting
To access the Gluetun logs do the following.
-
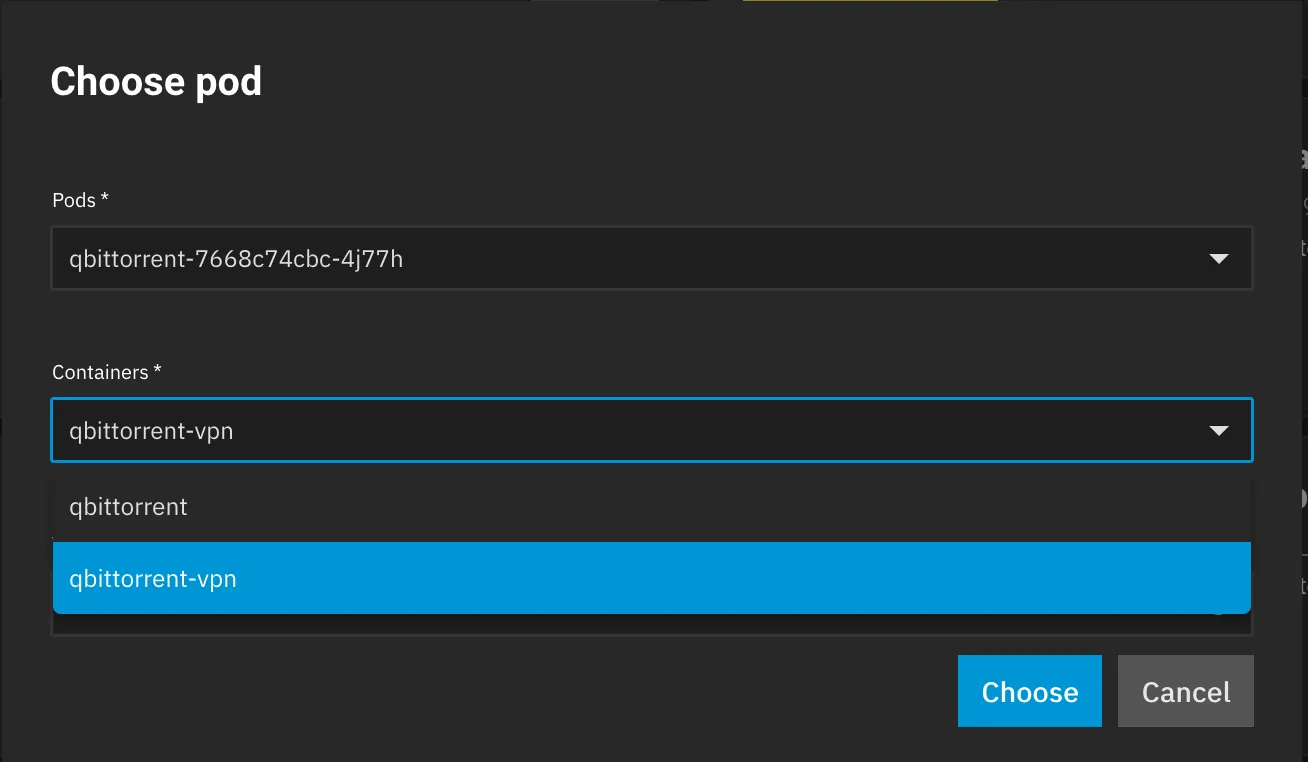
On the installed apps page, click the row for the app you are using with Gluetun.
-
In the Workloads pane on the right, click the “View Logs” icon (see image)
![]()
- In the Containers dropdown select the log that ends with “-vpn”.